
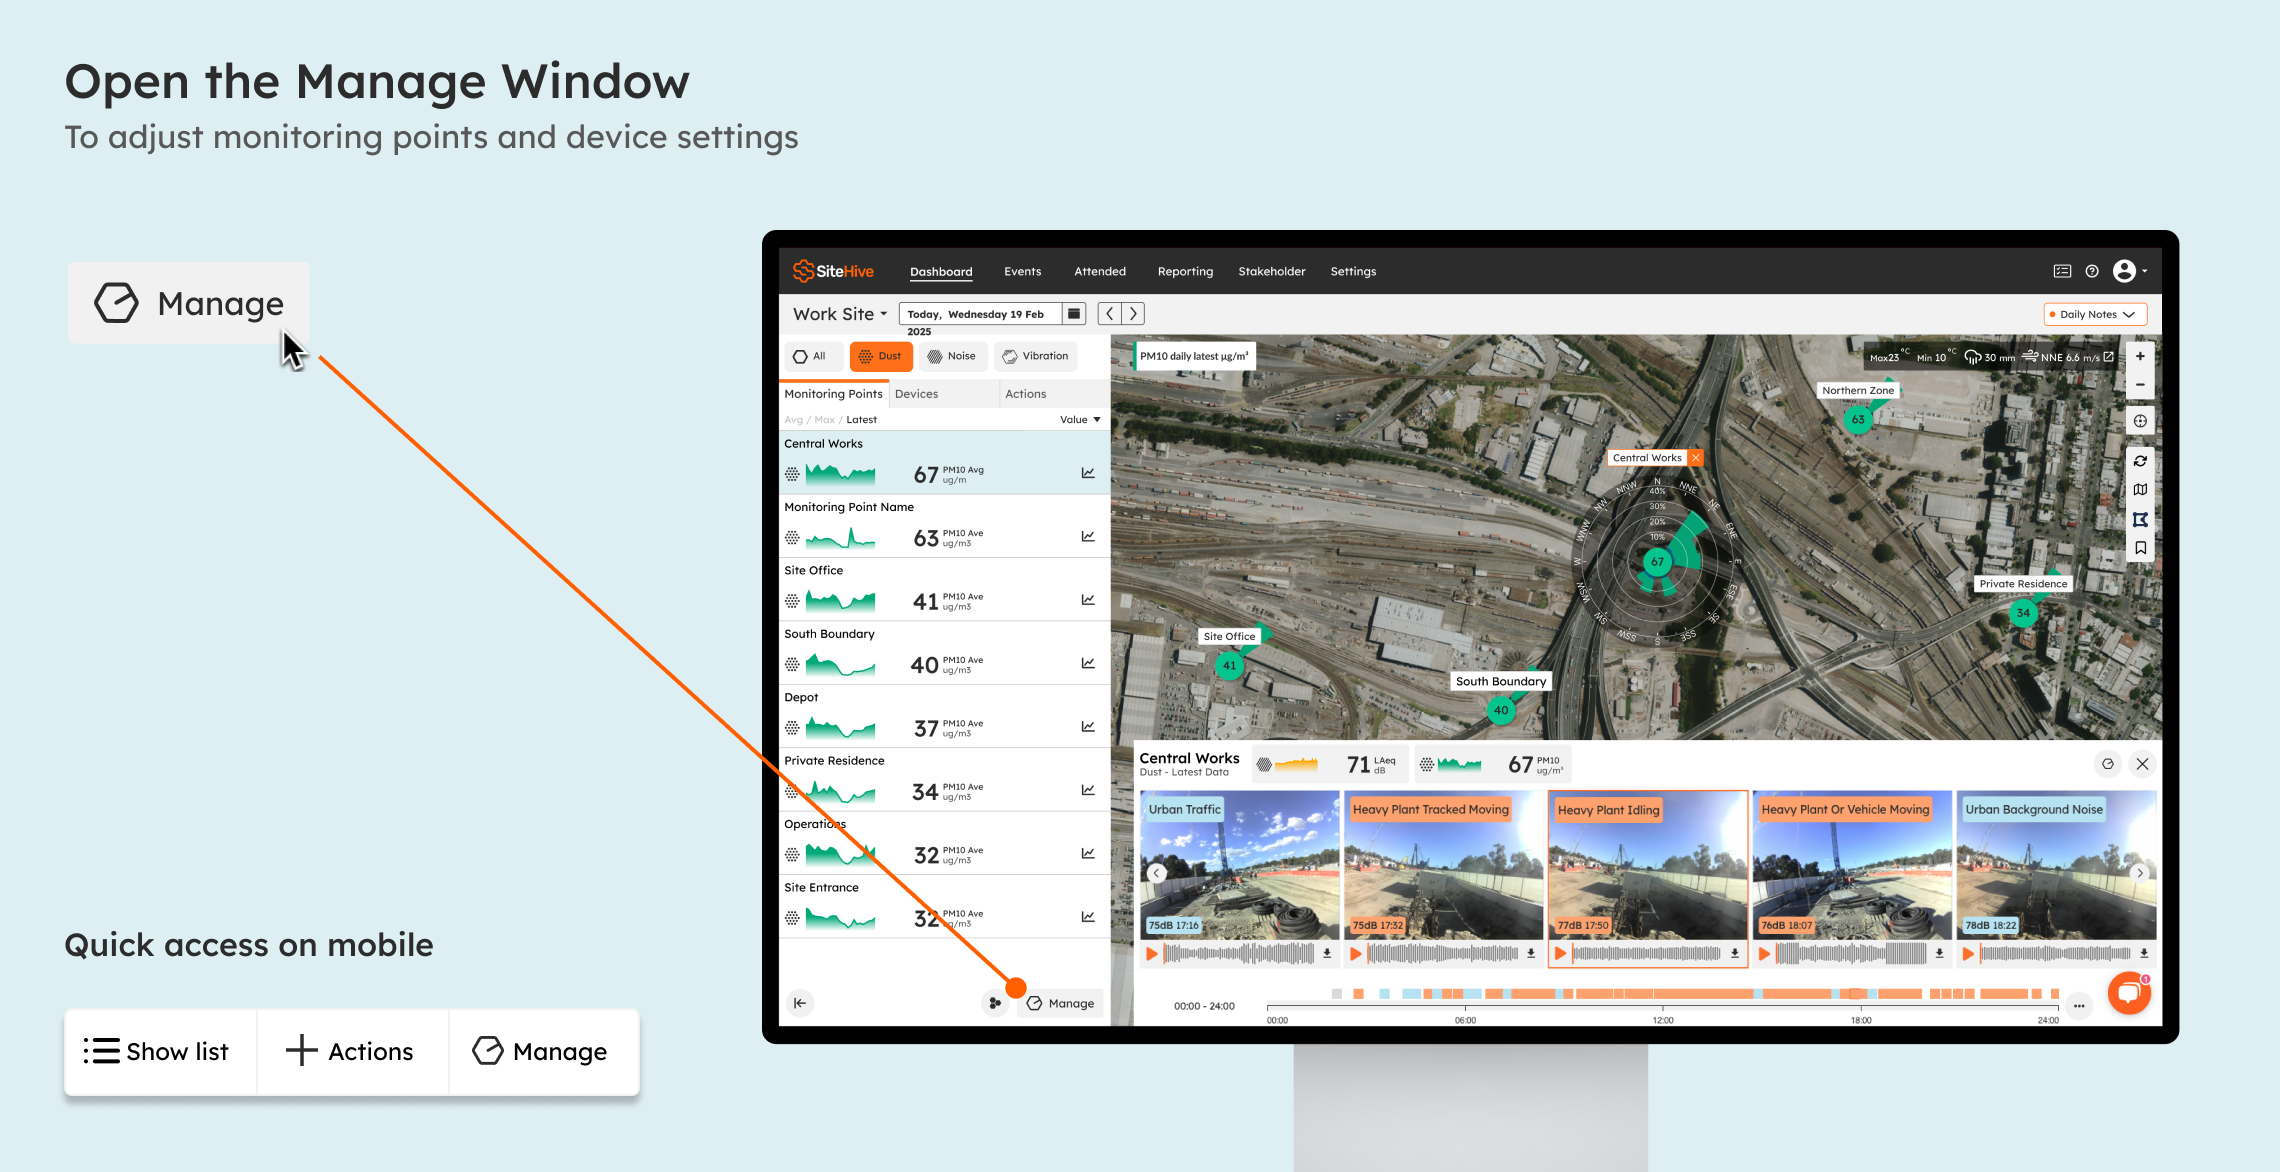
Click Manage to adjust settings and devices
The Manage window is where you look after a site once it is running: Monitoring Points and devices in one place, with rules, media triggers, power, signal, calibration details and the actions that change how a device is deployed.
Where to find it
On the Dashboard, select a Monitoring Point or a device in the side panel and click Manage at the bottom of the panel.
In the Devices tab of the side panel, click the up arrow next to a device name, the Manage button, or the Manage symbol in the top right of the media reel.
In Settings > Devices & Monitoring Points, click Manage on any row.
The window has two views, Monitoring Point and Device, and you can switch between them without closing it.
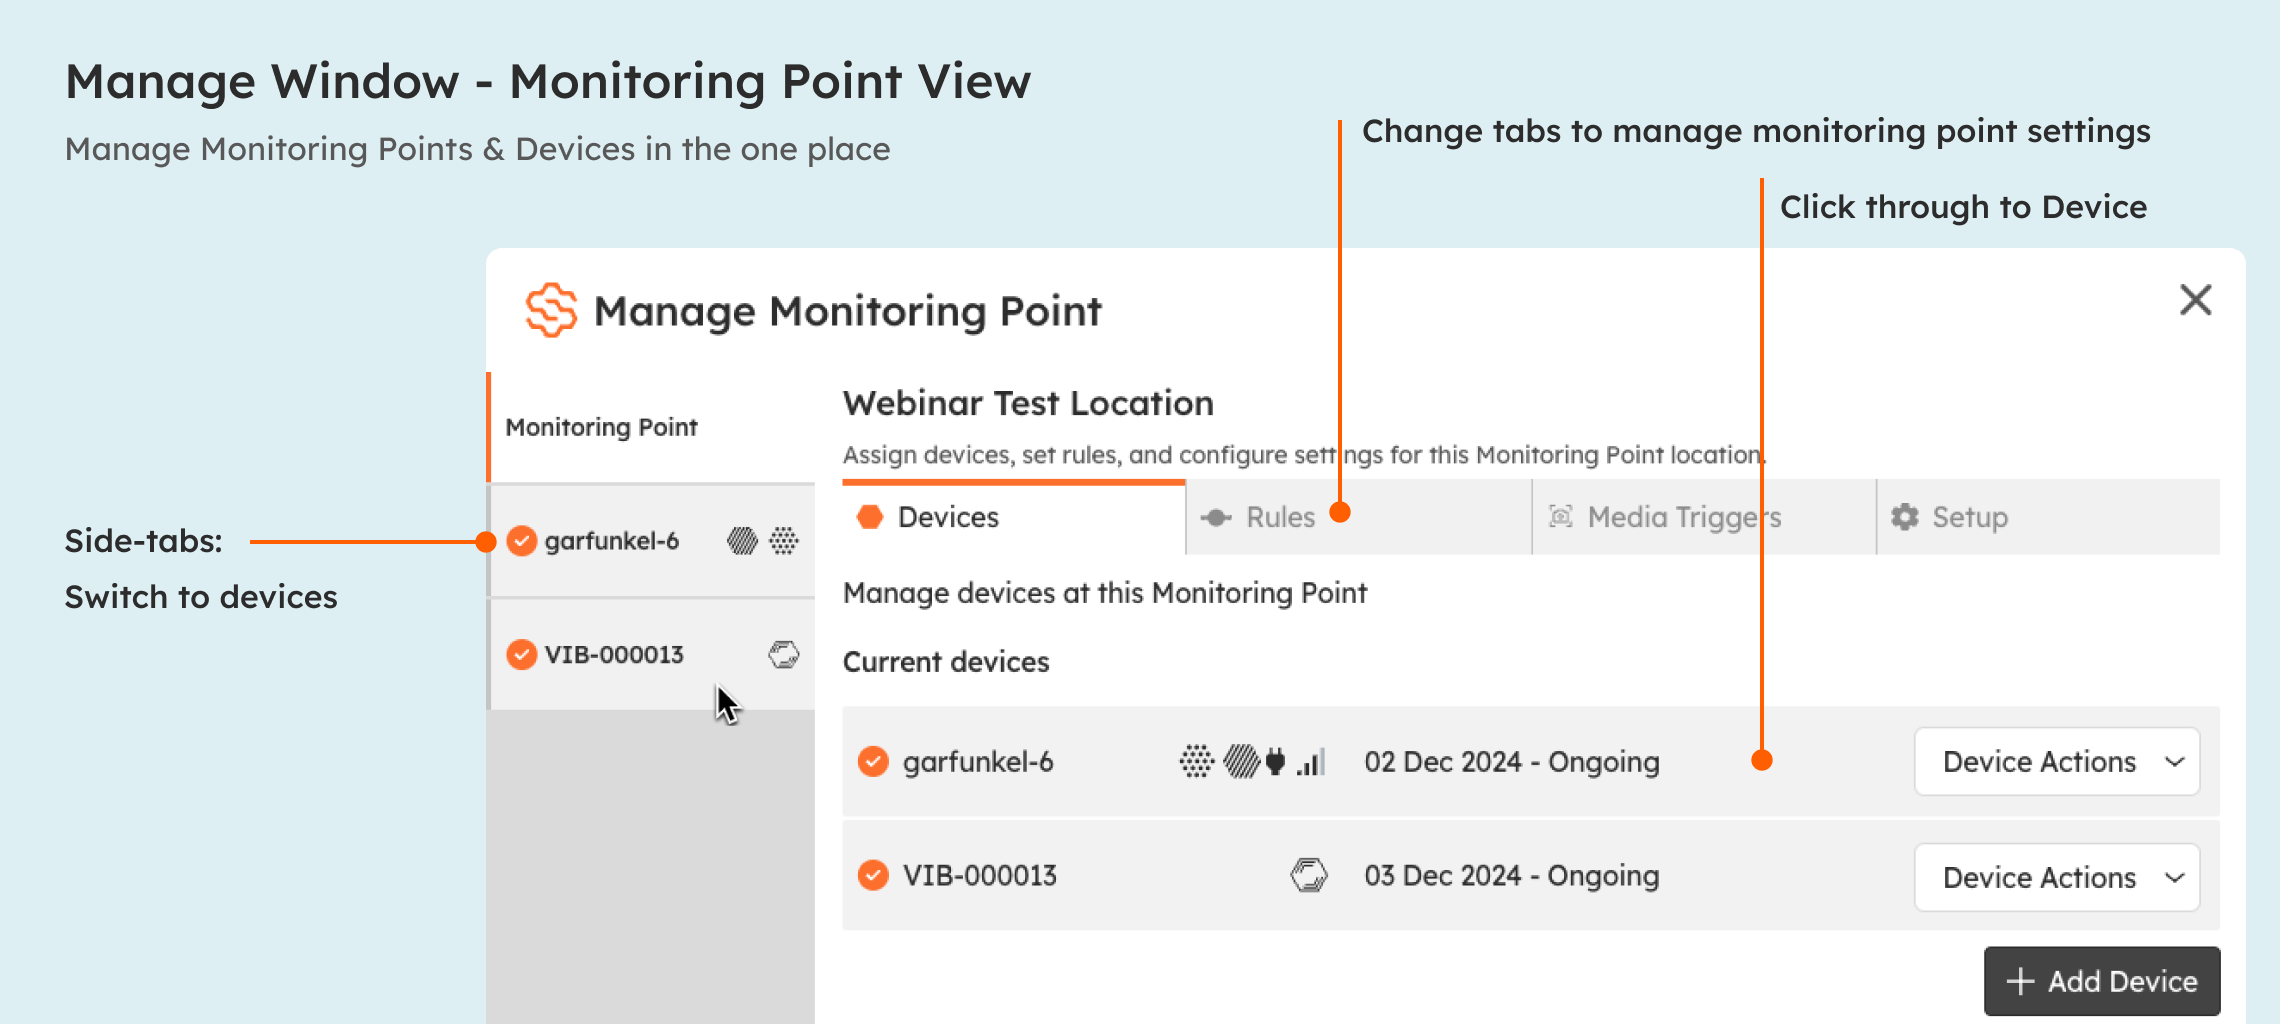
The Monitoring Point view
When a Monitoring Point is selected The Manage window shows:
Devices: the devices at this Monitoring Point. Each current device has a line showing its status, serial number, battery and signal, monitoring dates, and a Device Actions menu (see below). Add Device assigns another device to this Monitoring Point. Previous devices lists the devices that were here previously (device history at this Monitoring Point), each with an Edit button for its dates.
Rules: the rules that apply at this Monitoring Point. Set up and edit them here or in Settings > Rules & Notifications.
Media Triggers: the LAmax level that captures photos and audio at this Monitoring Point (default 75 dB). See Set up media triggers.
Setup: Advanced settings, and the Monitoring Point's name and position can be adjusted.
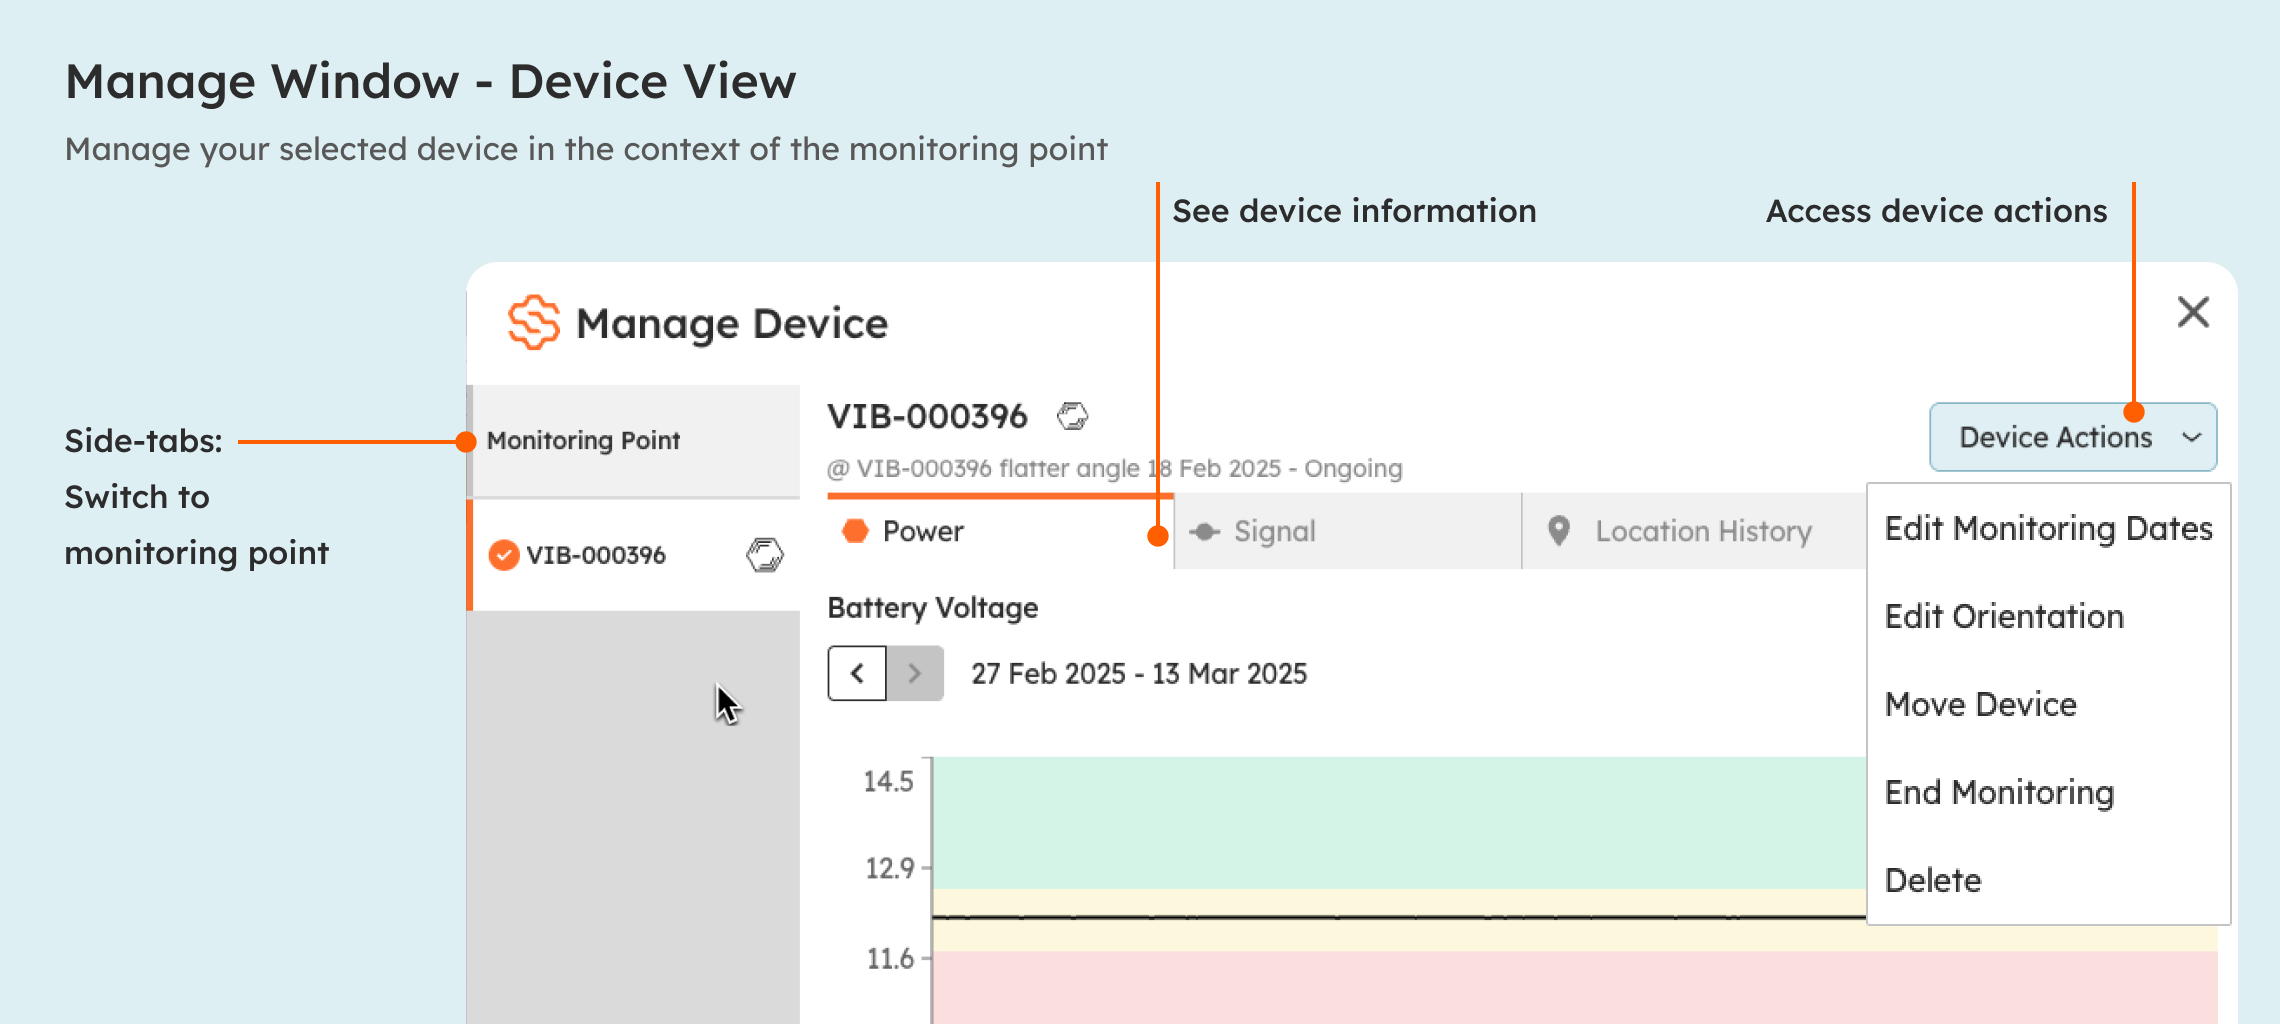
The Device view
Select a device, from the side tabs or from its line on the Devices tab, to see its information and health:
Power: the battery level. Below 25% triggers the low-battery alert at 8 am if you have it turned on.
Signal: connectivity. A healthy battery with a device offline usually means weak signal.
Location History: where this device has been: its Monitoring Points over time, and the positions its GPS has reported.
Details: the calibration date and calibration due date, and the calibration certificate to view or download. You can also attach your own documents to a device here, such as photos or maintenance logs. See Assured calibration and certificates.
Device Actions: make adjustments to the device deployment.
💡 Checking several devices? Settings > Devices & Monitoring Points lists them all, and its Download certificates button gets every calibration certificate in one go.
Device Actions: change how a device is deployed
The Device Actions menu is on every device line in the Devices tab, and at the top of the Device view. It holds the changes to how a device is deployed: its dates, its orientation, the Monitoring Point it is at, and when it stops. Each action is walked through step by step on its own page; this is the short version, for choosing.
Edit Monitoring Dates
Use it when the start time was incorrect in Easy Setup, or an end date needs tidying.
Changes the start or end of the device's time at this Monitoring Point. For a device that has already left the site, use Edit on its row under Previous devices. Step: Move or end the device (Fix the dates afterwards).
Edit Orientation
Use it when noise events point the wrong way on the map or in media, when wind direction reads wrong on a weather device, or when the device line shows the 0° orientation warning.
Sets the compass bearing the device faces, which Direction of Arrival for noise and wind direction for weather both depend on. It is shown for noise and weather devices, which have an orientation; dust and vibration devices do not. Step: Check and adjust your device's orientation.
Move Device
Use it when the works have moved and the device goes with them.
Assigns the device to another Monitoring Point in three steps: choose the Monitoring Point, set the monitoring dates, confirm the orientation. End current assignment is ticked by default, so the record here closes as the new one starts. Rules stay with the Monitoring Point, not the device. Step: Move or end the device.
End Monitoring
Use it when monitoring is finished at this Monitoring Point, or a replacement device is taking over.
Closes the device's assignment at a date and time. The data stays with the Monitoring Point, and the device is free to assign elsewhere. Steps: Move or end the device; for a replacement, Swap a device.
The last item, Delete, removes the assignment and its history at this location. You will almost never use this, mainly to remove accidental deployments. To stop monitoring from a date, use End Monitoring instead.
💡 Add Device, on the Devices tab, is how a second device joins a Monitoring Point that already exists, and how a replacement takes over in a swap: End Monitoring on the old device's line, then Add Device for the new one, without leaving the window. Add Device runs the same steps as Easy Setup (choose the device, set the monitoring dates, confirm the orientation) without the rules step, because the rules already belong to the Monitoring Point.
What the Manage window is not for
Adding a brand new device at a new location is done with Easy Setup, from the Actions tab of the side panel. Easy Setup creates the Monitoring Point and assigns the device in one pass. From then on, the Manage window is where that Monitoring Point is looked after, including adding another device to it with Add Device.
What's next
Move or end the device (Move Device, End Monitoring and fixing the dates, step by step)
Check and adjust your device's orientation (does the direction of arrival match the site?)
Swap a device (a replacement takes over the Monitoring Point)
Device offline? If a device goes offline (read the Power and Signal tabs first)